Write Beautiful REST Documentation with Swagger
Swagger is the most widely used standard for specifying and documenting REST Services.
The real power of the Swagger standard comes from the ecosystem of powerful tools that surrounds it.
For example, there’s Swagger Editor for writing the Swagger spec, Swagger Codegen for automatically generating code based on your Swagger spec, and Swagger UI for turning your Swagger spec into beautiful documentation that your API users will love to read.
Why use Swagger?
But why not use another standard (like RAML) or simply open your favorite word processor and start hitting the keys?
There are 5 good reasons for using Swagger:
- Industry Standard: Swagger is the most widely adopted documentation and specification standard for REST Services. This means that it’s already used in real production APIs, so you don’t have to be the beta tester. It also means that the API user has probably already experience with Swagger, which dramatically reduces the learning curve.
- Designed for REST: Swagger is really easy to use, because it’s a single-purpose tool for documenting REST Services. So most of the complicated things, like security or reusing resource definitions across several methods, are already handled gracefully by the standard.
- Huge Community: There’s a great community around Swagger, so when you face a problem, you can usually just Google the solution.
- Beautiful Documentation: The customer-facing documentation looks really nice. Plus there is a built-in way to actually call the services, so the API user won’t need to use an external tool to play around with the services, but can just do it inside the documentation.
- Auto-generate Code: You can auto-generate client and server code (interface part) based on the Swagger spec, which makes sure that they are consistent. You could even make your own tools.
How to get started with Swagger?
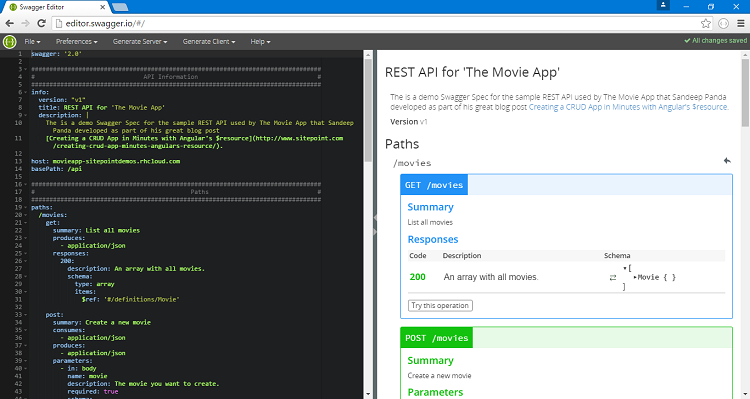
To start writing a Swagger spec, you simply open the online Swagger Editor and start writing according to the Swagger specification.
You can see a screenshot of the Swagger Editor below. You write your spec in the left-hand side, and you can see the resulting documentation in the right-hand side:
For this post, I’ve created a Swagger specification for the Movie REST Service, which Sandeep Panda developed as part of his post on Angular’s $resource.
If you want to play with the example I use in this section:
- Open the Swagger Editor.
- Open the “File” menu, and select “Import URL…”
- Enter http://www.kennethlange.com/resources/movie_swagger.yaml in the box.
Now let’s walkthrough the example spec!
Part 1: General Information
The first thing that you will notice is that Swagger is written in YAML, which is a format that is very easy to read — even for non-technical people.
In the top part of the Swagger specification, you write all the general stuff about your API:
swagger: '2.0'

############################################################################
#                            API Information                               #
############################################################################
info:
  version: "v1"
  title: REST API for 'The Movie App'
  description: |
    The is a demo Swagger Spec for the sample REST API used by The Movie App that Sandeep Panda developed as part of his great blog post [Creating a CRUD App in Minutes with Angular's $resource](http://www.sitepoint.com/creating-crud-app-minutes-angulars-resource/).

host: movieapp-sitepointdemos.rhcloud.com
basePath: /api
Here is an explanation of some of the properties:
- swagger: This is to say we use Swagger 2.0. It should always be “2.0”.
- title: The title of your API documentation.
- description: A description of your API. It is always nice with examples.
- version: The version of your API (remember that for APIs a low version number is always more attractive, because a high number indicates an unstable interface and hence an extra burden on the clients using it.)
- host: The server where your REST API is located.
- basePath: The path on the server where your REST API is located.
Part 2: REST Services
In the middle part, you define the paths and HTTP Methods.
I have only included PUT below, but you can see the rest in my Swagger file.
############################################################################
#                                     Paths                                #
############################################################################
paths:
  /movies/{id}:
    put:
      summary: Update a movie
      consumes:
        - application/json
      produces:
        - application/json
      parameters:
        - in: path
          name: id
          type: number
          description: The id of the movie you want to update.
          required: true
        - in: body
          name: movie
          description: The movie you want update with.
          required: true
          schema:
            $ref: '#/definitions/Movie'
      responses:
        200:
          description: The movie has been successfully updated.
          schema: $ref: '#/definitions/Message'
Below paths you define a path (e.g. /movies/{id}) and then you define the HTTP methods (e.g. PUT) that the path can be used with.
- summary: A short description of the service. There is also a description property for a more lengthy description, if necessary.
- consumes: The content type of the data that the service consumes (you can have multiple types). The most common is application/json.
- produces: The content type of the data that the service produces (you can have multiple types). The most common is application/json.
- parameters: The different parameters that the service accepts. It is both parameters in the HTTP header, URI path, query string and HTTP request body.
- in: Where is the parameter located? In the path, in the body, in a header, or somewhere else?
- name: The name of the parameter.
- type: The data type of the parameter. The common types are number and string.
- description: A short, user-friendly description of the parameter.
- required: Is the parameter required or optional?
- responses: The possible responses that the service can return.
- (HTTP Status Code): You first specify the HTTP Status Code (e.g. 200).
- description: A short description of when this response happens.
- schema: A definition of the response object (see next section for details).
- (HTTP Status Code): You first specify the HTTP Status Code (e.g. 200).
Part 3: Resource Definitions
In the last part of the Swagger spec, you have shared resource definitions.
Given that the movie resource representation is used in almost all methods, it makes sense to write the resource definition in a single place and reuse it across the methods.
############################################################################
#                               Definitions                                #
############################################################################
definitions:
  Movie:
    type: object
    properties:
      _id:
        type: number
        description: A unique identifier of the movie. Automatically assigned by the API when the movie is created.
      title:
        type: string
        description: The official title of the movie.
      releaseYear:
        type: string
        description: The year that the movie was released.
      director:
        type: string
        description: The director of the movie.
      genre:
        type: string
        description: The genre of the movie.
      __v:
        type: number
        description: An internal version stamp. Not to be updated directly.
Below definitions you define a resource type (i.e. Movie) and then you define its properties below:
- type: The data type of the property. The common ones are string and number. The advanced types are objects and arrays.
- description: A description of the property.
- properties: If the data type is an object, you specify the object’s properties below.
If you need to define complex JSON objects, you can be inspired by the great examples found in Swagger Editor. You can find them by opening the “File” menu, and select “Open Example…”
How to turn your Swagger spec into API Documentation
Once your Swagger spec is stable — and your REST API is operational — you can publish your Swagger spec as customer-facing documentation.
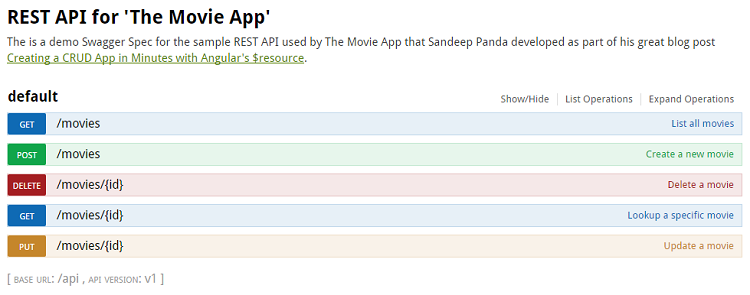
For this purpose you can use Swagger UI, which converts your Swagger spec into a beautiful, interactive API documentation (you can see an online example here).
You can download Swagger UI from here. It is just a bundle of HTML, CSS and JS files, which doesn’t require a framework or anything, so they can be installed in a directory on any HTTP server.
Once you have downloaded it, you put your swagger.yaml file into the dist directory — and open index.html and change it to point at your swagger file instead of http://petstore.swagger.io/v2/swagger.json.
Then you can open index.html in your browser, and see your new beautiful, interactive API documentation:
That’s it! Now you have learned all the basic elements of Swagger. Don’t forget to read Swagger specification if you really want to become a Swagger expert.