Drag and Drop in Pure TypeScript and React
When you need to move on-screen objects, drag and drop is such a direct, intuitive, and just plain nice way of doing it compared to clicking buttons and other indirect ways of moving objects.
Initially, drag and drop functionality was really tricky to support in HTML and JavaScript due to the document-oriented background of these technologies, but HTML5 introduced a super easy way to add drag and drop functionality to web apps.
Basically, we just need to follow the four steps below to enable drag and drop. The first two steps enable the dragging, and the last two steps enable the dropping:
- Set the draggabe attribute on the HTML element that you wish to drag.
- Add an onDragStart event handler to the draggable HTML element to store its identifier when it’s being dragged.
- Add an onDragOver event handler to the HTML element that should be able to receive dropped elements.
- Add an onDrop event handler to the HTML element that can receive dropped element to handle what should happen when a dragged element is dropped onto it.
In the follow sections, we will look into each of these steps. Rather than using a library, such as react-dnd, we will implement the steps in pure TypeScript and React.
1. Set the Draggable Attribute
By default, HTML elements are not draggable, so to make one draggable, you need to set its draggable attribute to true, as shown below:
<div id="d1" draggable="true">Drag me</div>
<div id="d2" draggable="true">Or me!</div>
This ensures that the HTML element can be dragged. Obviously, it’s no fun to drag an element without having anywhere to drop it, but it’s a good start.
2. Add an onDragStart Event Handler
Unless you only have one draggable element, you will need to store an identifier of the element that is currently being dragged, so you can identify the element if it’s being dropped.
For this purpose, we add an onDragStart event handler to the draggable elements:
<div id="d1" draggable="true" onDragStart={handleDragStart}>Drag me</div>
<div id="d2" draggable="true" onDragStart={handleDragStart}>Or me!</div>
The event handler itself can be pretty straight forward:
const handleDragStart = (event: React.DragEvent<HTMLDivElement>) => {
    event.dataTransfer.setData('text', event.currentTarget.id);
}
Here we’re using DragEvent, a synthetic React event, as the type of the argument to the event handler, and specifying that it must be a Div element. Depending on the use case, we can pick a more generic type, such as HTMLElement (event: React.DragEvent), or leave out the template entirely (event: React.DragEvent). Personally, I like the types to be as precise as possible to catch as many errors as possible upfront.
Inside the event handler, we call setData to store the identifier of the dragged element in the dataTransfer object, which can later be read by the HTML element that the dragged element is dropped upon. The first argument (‘text’) given to setData is the type of the identifier given as the second argument, and not a property name.
💡 Tip: Remember that id attributes on HTML elements must be globally unique, not just unique for the element type, so a simple number (such as a numeric primary key from a database) might not be enough in itself to guarantee uniqueness, but you can prefix it with something to ensure uniqueness; for example, task_${task.id}.
3. Add an onDragOver Event Handler
By default, an HTML element cannot receive dropped elements, so we must override this behavior on the HTML element that should receive dropped elements.
This is easily done by adding an event handler that simply prevent the default behavior:
const enableDropping = (event: React.DragEvent<HTMLDivElement>) => {
    event.preventDefault();
}
Add the event handler to the receiving HTML element:
<div onDragOver={enableDropping}>Drop Area</div>
4. Add an onDrop Event Handler
When an HTML element is being dropped, we want to perform some kind of action. This can be done in an onDrop event handler on the element that receives the dropped element:
<div onDragOver={enableDropping} onDrop={handleDrop}>Drop Area</div>
And add the code to the HTML element that can receive dropped elements:
const handleDrop = (event: React.DragEvent<HTMLDivElement>) => {
    const id = event.dataTransfer.getData('text');
    console.log(`Somebody dropped an element with id: ${id}`);
}
We use the getData method to retrieve the identifier that we set in onDragStart event handler, so we can do something meaningful with the dropped object.
That’s basically all the code we need to enable basic drag and drop functionality in a web app. The code snippets in previous sections are collected into a complete example in the next section.
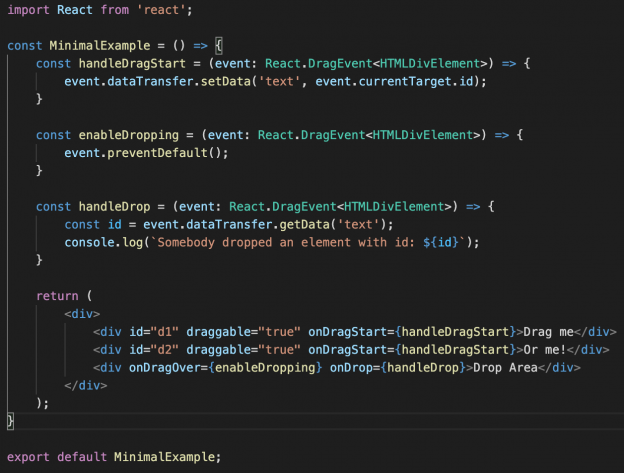
Example 1: A Minimal Drag and Drop Example
For copy/paste convenience, the complete minimal is listed below:
const handleDragStart = (event: React.DragEvent<HTMLDivElement>) => {
    event.dataTransfer.setData('text', event.currentTarget.id);
}

const enableDropping = (event: React.DragEvent<HTMLDivElement>) => {
    event.preventDefault();
}

const handleDrop = (event: React.DragEvent<HTMLDivElement>) => {
    const id = event.dataTransfer.getData('text');
    console.log(`Somebody dropped an element with id: ${id}`);
}

return (
    <div>
        <div id="d1" draggable="true" onDragStart={handleDragStart}>Drag me</div>
        <div id="d2" draggable="true" onDragStart={handleDragStart}>Or me!</div>
        <div onDragOver={enableDropping} onDrop={handleDrop}>Drop Area</div>
    </div>
);
Example 2: Highlight the Drop Area when an HTML is Dragged Over
A missing feature in the drag and drop functionality in HTML5 is that there is no CSS pseudo selector (like :hover on mouse over) to highlight an HTML element when another element is being dragged over it. For example, like in MacOS, where a folder is highlighted when a file is being dragged over it.
But, fortunately, we can easily simulate this hover-like functionality by using the onDragEnter and onDragLeave event handlers as shown in the example below:
const [ dragOver, setDragOver ] = React.useState(false);
const handleDragOverStart = () => setDragOver(true);
const handleDragOverEnd = () => setDragOver(false);

const handleDragStart = (event: React.DragEvent<HTMLDivElement>) => {
    event.dataTransfer.setData('text', event.currentTarget.id);
}

const enableDropping = (event: React.DragEvent<HTMLDivElement>) => {
    event.preventDefault();
}

const handleDrop = (event: React.DragEvent<HTMLDivElement>) => {
    const id = event.dataTransfer.getData('text');
    console.log(`Somebody dropped an element with id: ${id}`);
    setDragOver(false);
}

return (
    <div>
        <div id="d1" draggable="true" onDragStart={handleDragStart}>Drag me</div>
        <div id="d2" draggable="true" onDragStart={handleDragStart}>... Or me!</div>
        <div
            onDragOver={enableDropping}
            onDrop={handleDrop}
            onDragEnter={handleDragOverStart}
            onDragLeave={handleDragOverEnd}
            style={ dragOver ? {fontWeight: 'bold', background: 'red'} : {} }
        >
            Drop Zone
        </div>
    </div>
);
That’s it. Good luck with making your web apps more intuitive with super cool drag and drop functionality.
Happy coding! 🚀
PS. The code is available at GitHub (https://github.com/kenneth-lange/tsx-drag-and-drop).